Entrian Sequencers: VCV Rack Plugin
Introduction
CV, a CV sequencer.
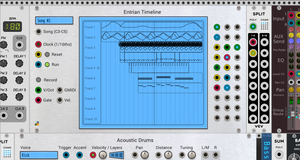
Outputs
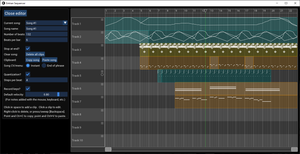
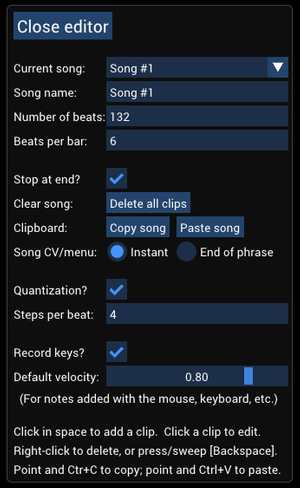
The editor
Mouse and keyboard gestures
- Right-click a scrollbar to reset its position.
- Hold Ctrl while dragging a scrollbar thumb to zoom rather than scroll.
Clock / Reset / Run
Joining sequencers together: shared playheads
Copy/Paste
Repeating patterns
Importing MIDI files
You can import MIDI files into Entrian Sequencers (and the Player modules in the Entrian Free plugin). Here's a 4-minute video demo:
To import a melody or drum groove into Timeline, click in empty space to add a clip, and choose one of the MIDI options. From there you can choose your MIDI file, and choose one or more tracks to import. To import CV, you need to create a CV clip that's long enough, then show the editor and click the "Import from a MIDI file..." button.
To import into Melody, Drummer, or CV, show the editor and click the "Import from a MIDI file..." button.
You can also drag and drop a MIDI file from your disk, or a MIDI clip from tools like Scaler 3, into the editor.
Here's the MIDI import dialog:
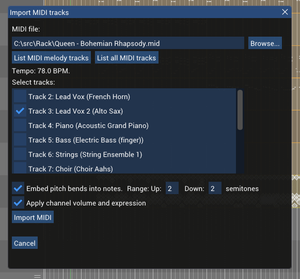
You can import multiple MIDI tracks at once into a single sequencer track, so in this example you only need one oscillator to play both of the French Horn MIDI tracks.
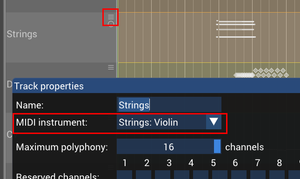
Importing a MIDI file also imports the instrument assignments (so you can round-trip to MIDI export without having to set all the instruments). If you import mulitple intruments into the same track, the first one to appear will be set for the imported track.
When you're importing melody or drums, you can choose to import expression information like pitch bend, channel volume, and expression pedal into the notes themselves, or you can switch that off and import them separately as CV channels if you want full control. You can specify the number of semitones that the pitch bend range corresponds with, independently for upward and downward bends.
When you're importing drums, be aware that not all MIDI files identify their drum tracks as drum tracks, so clicking the "List MIDI drum tracks" button might not show them. That's why the "List all MIDI tracks" button is there.
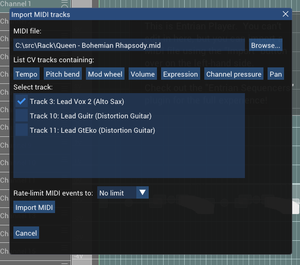
The supported CV import types are Tempo, Pitch bend, Mod wheel, Channel volume, Expression pedal, Channel pressure, and Pan:
MIDI export
Recording from MIDI devices
Arming a track using a MIDI device or CV
Polyphonic CV recording
Simultaneous recording
Step recording
To record a melody or a drum groove step-by-step, connect a MIDI-CV module to the recording inputs, then enable Record and disable Run. Now, when you hit a note on your keyboard / drum pads / whatever, that note will be added at the playhead position and the playhead will move forwards by the quantisation amount, ready for the next note. To add a rest, ensure your mouse cursor is hovering over the module and press the spacebar.
Step recording works one note at a time. You can use repeat markers to mark the section of the clip that you want to step-record into, and when you reach the end marker, the playhead will loop back to the start. That's how to step-record a polyphonic melody sequence, or a drum groove with multiple instrument hits at the same playhead position (rather than trying to hit two keys at exactly the same time!)
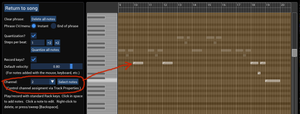
Polyphony and channel assignment
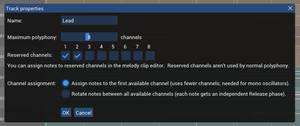
So here I’ve limited it to 8 channels, and told it that I want to reserve channels 1 and 2 for my own use. Normal polyphonic notes will be assigned to channels 3-8, and if I bust that limit, new notes will override older ones.
You can set the polyphony all the way down to 1 for monophonic behaviour.
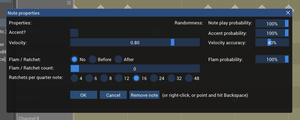
Having reserved some channels, you can assign notes to channels individually via Note Properties:
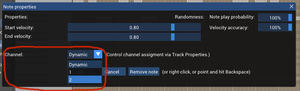
Notes that are assigned to a channel are painted with a little diagonal tag at their left-hand end, with each channel being displayed with a differently coloured tag.
You can highlight all the notes in a clip that live on a particular channel:
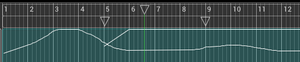
Swing
The Swing feature lets you offset some of the beats within the rhythm of your piece, so that rather than a regular rhythm, DAH dah DAH dah DAH dah DAH dah, some of the notes are offset. A typical swing rhythm delays every even-numbered note so that the odd-numbered notes are about twice as long as the even-numbered ones: DAH... dah-DAH... dah-DAH... dah-DAH...
The Entrian sequencers give you quite a lot of flexibility when defining a Swing pattern:
- You can offset quarter notes, eighth notes, or sixteenth notes.
- You can either delay them or bring them forward in time.
- You can control the exact fraction of a note by which they are offset.
- The whole sequence.
- Different songs within a sequence.
- Different tracks within a song.
- Different clips within a track.
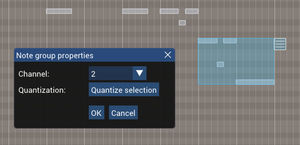
- Different channels (eg. drum voices) within a clip.
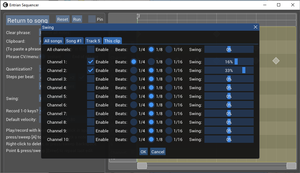
A more-specific pattern overrides a less-specific one, so for example a track-wide pattern applies to all the clips in that track unless a specific clip defines its own pattern.
The potential for making a truly hideous cacophany is huge. You're welcome.
Example patches
Sharing your patch
Downloading and installing
Bugs and missing features
Release history
Version 2.3.3: 18th July 2026:
- In the editor, shortcuts like Ctrl+Z now work properly on non-English keyboards. Thanks, Rainer.
- Added "Set playhead to start marker on reset" to the context menu. Thanks, Scott.
Version 2.3.2: 28th May 2026:
- You can now drag and drop a MIDI file from your disk, or a MIDI clip from tools like Scaler 3, into the editor. Thanks, Jens Peter. #77
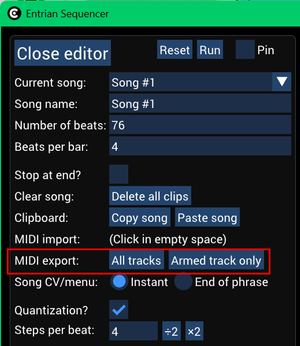
- You can now export your sequence as a MIDI file, either for single tracks or all the tracks. Thanks, Dominic, brbbbq, and Rob. #88
Version 2.2.1: 21st September 2023:
- Don't leave "notepoints" files in the working directory. That was a debugging feature that was accidentally left enabled in the production build.
Version 2.2.0: 20th September 2023:
- macOS arm64 is now supported.
- You can now resize multiple notes at once in the editor window. Thanks, Coirt and mysterybear. #37
Version 2.1.25: 3rd July 2022:
- Don't crash when importing a MIDI file with channel volume or channel expression on track 17 or higher. Thanks, Alain.
- CV clips in a sequencer set as a playhead follower now play smoothly. Thanks, Alain.
Version 2.1.24: 12th January 2022:
- Added support for Rack V2. #84
- Added the "Automatically create repeat markers when recording" option. Thanks, nay-seven. #68
- Added Swing. #57
- Fixed a crash-on-exit bug. Thanks, Drew, Ewen, and Vortico. #73
Version 1.1.22: 24th May 2021:
- Added the "Delay Clock" context menu commands. Thanks, spectromas. #76
Version 1.1.21: 3rd April 2021:
- Fixed a bug whereby a Reset could get out of step with other sequencers.
- Pointing at the module and pressing Backspace once again deletes the module.
Version 1.1.20: 30th March 2021:
- Added Step Recording. Thanks, Paul. #70
- When a Drummer module is set up as a Playhead Follower, it no longer occasionally drops notes. Thanks, Gretchen. #67
- Quantisation now works properly for values of steps-per-beat that don't divide into 96. Thanks, Paul. #69
Version 1.1.19: 26th January 2021:
- Increased the CV range to ±10V. #47. Thanks, Ewen and Latif.
- Added channel rotation. #53 and #60. Thanks, Serge and ROGAVKA.
- Where a drum note is a ratchet with a probability, and the ratchet comes before the note, and the note plays without the ratchet, the note now plays at the right time rather than playing the first note of the ratchet. Thanks, Tom. #63.
Version 1.1.18: 24th September 2020:
- Parameterized track arming. #50. Thanks, Harlan.
- Support for multi-instrument Type 0 MIDI files. #49.
- MIDI import pitch bend range control. Thanks, Espen.
- The editor window no longer loses its resizeability after you've launched a VCV-Host editor window.
Version 1.1.17: 5th September 2020:
- MIDI import in both Entrian Sequencers and Entrian Free.
- Dedicated CV module, to complement the Melody and Drummer modules. Thanks, Ewen. #40.
- Polyphonic CV recording. Thanks, Artem and Ewen. #39.
- Copy/Paste of single channel vs. all channels for CV.
- Controllable vertical snapping in the CV editor: disable snapping, or snap to increments of 1V, 1/12th V, BPM. #6. Thanks, Jue.
- Context menu setting for "Stop recording at end of song". Thanks, Artem.
- "End of phrase" output (Melody, Drummer, CV) and "End of clip" output (Timeline). Thanks, Jue. #31.
- The piano keyboard in the Melody editor now displays the names of the notes ("C4" etc.) Thanks, NoCode.
- Holding Alt while dragging locks the drag to horizontal or vertical movement.
- Ctrl+A now selects all the notes in a clip. #25.
- Hold Ctrl while dragging a scrollbar thumb to zoom rather than scroll; the opposite thumb mirrors your movements.
- You can now pin the editor window so that it stays on top of other windows. #14. Thanks, Coirt.
- There are now Run / Reset buttons in the editor and corresponding outputs on the panel, so you can control your clock from the editor. #22. Thanks, Eurikon.
- The playhead and repeat markers now appear on the panel, so you can move the playhead and control the repeat range directly. #1.
- Shared playheads: connect the playheads of multiple sequencers together, so moving the playhead in one of them moves it in all of them. #46.
- Reduced CPU usage with complex songs.
Version 1.1.16: 22nd June 2020:
- Clicking a Timeline track label on the panel screen now arms that track for recording. #1
- Right-clicking a scrollbar in the popup editor resets its position. #2
- The Melody editor can now scroll vertically by semitones rather than only by white notes, and the piano keys now line up with the editor underlay at all times. Thanks, Phil. #13
- Fixed-channel Melody notes now have coloured corner tags according to their channel. Thanks, Phil. #33
- When quantization is enabled, the lengths as well as positions of recorded notes are now quantized. Thanks, Ewen. #34
- Added a Clear button to the right of the Record button. In Melody and Drummer this clears the phrase; in Timeline it clears the armed clip. Thanks, Jean-Sébastien. #34
- Pasting in a Portable Sequence with an insanely short note no longer crashes. Thanks, Guy. #42
- When recording a chord, adding a new note to the chord no longer retriggers the already-playing notes. Thanks, Jean-Sébastien. #43
- The bar lines for very long songs now paint properly in the editor. Thanks, Ken. #44
- There's now a Display checkbox for quantization, which paints the quantization grid in the editor. Thanks, Steve.
- When you disconnect the recording cables while auditioning notes through them, the notes no longer continue playing.
- The panel buttons now trigger on any value greater than zero, making them easier to control with µMap etc.
Version 1.1.14: 9th March 2020
First public release.