Entrian Acoustic Drums: VCV Rack Plugin
Entrian Acoustic Drums is a VCV Rack plugin that brings the sounds of real acoustic drums to Rack. It includes two modules: a sophisticated drum kit and a free drum sequencer.
Demo video
This short video demonstrates some of the features of the two modules:
Please note: Entrian Acoustic Drums includes a free copy of the drum sequencer from the Entrian Sequencers plugin. That plugin does everything the Acoustic Drums sequencer does and far more. If you were thinking of buying Acoustic Drums mostly for the sequencer, you should really go for Entrian Sequencers. Acoustic Drums is a drum kit with a free sequencer, not a full sequencer package.
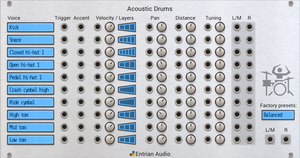
Entrian Acoustic Drums
- 27 instruments: drums, hi-hats, cymbals, and many other percussion instruments, all professionally recorded for this plugin.
- Multiple velocity layers per instrument, for true dynamics. Softer notes are actually softer, not just quieter.
- Multiple samples per layer, for natural variation.
- Every recording is actually two recordings, one close-mike and one room mike, with cross-fade between the two, for controlling ambience.
- Pan controls for laying out the kit in the stereo picture, or CV-controllable for throwing the instruments around your studio. :-)
- Tuning controls for controlling pitch.
- Individual outputs for the separate instruments, for effects, EQ, side-chaining, and so on, as well as mixed outputs for the whole kit.
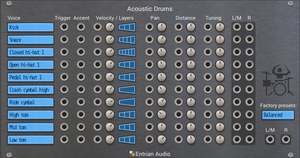
- Light and dark panels:
The built-in instruments
Kick,
Snare, Snare edge, Snare rimshot, Snare stickshot,
Closed hi-hat 1, Closed hi-hat 2,
Open hi-hat 1, Open hi-hat 2,
Half-open hi-hat 1, Half-open hi-hat 2,
Pedal hi-hat 1, Pedal hi-hat 2,
Crash cymbal 1, Crash cymbal 2,
Ride cymbal, Ride cymbal bell,
High tom, Mid tom, Mid low tom, Low tom,
Cabassa, Cowbell, Tambourine,
Belltree (down), Belltree (up), Frog, Vibraslap.
Custom samples
You can load your own custom samples into Entrian Acoustic Drums to play alongside the built-in instruments:
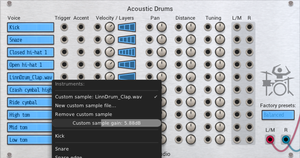
To load a custom sample, click one of the instrument screens and select "Custom sample file..." from the menu. You can then load any WAV or AIFF file to play.
The modulation options Velocity, Pan, Distance, and Tuning all work for custom samples.
The Distance modulation works for custom samples by creating a "distant" sample by applying a slight room-sized reverb to the sample. Adjusting the Distance knob fades between the original sample and simulated room mike, making it behave as it does for the built-in instruments (for which it fades between a real close mike and a real room mike).
The instrument menu includes a Gain slider, which lets you cut or boost the gain of the sample to get it into balance with the other instruments. (The Velocity input and knob still work for custom samples, but the Gain slider has more range, letting you balance samples that are far too quiet or far too loud.)
You can load up sets of multiple samples for multiple velocity layers, and/or for multiple round-robin samples for the same velocity.
When you load a custom sample file, Entrian Acoustic Drums looks for similarly-named samples in the same directory, with filenames containing the sequences v1, v2, v3 for velocity layers, and/or r1, r2, r3 for multiple recordings within a velocity layer. That easily allows for four possible cases:
- Just one sample with whatever name you like, eg.
tabla.wav - A set of recordings to be played round-robin (or random-robin), eg.
tabla_r1.wav,tabla_r2.wav,tabla_r3.wav - A set of recordings for different velocities, eg.
tabla_v1.wav,tabla_v2.wav,tabla_v3.wav - A set of recordings with multiple recordings in mulitple velocity layers:
tabla_v1_r1.wav,tabla_v1_r2.wav,tabla_v2_r1.wav,tabla_v2_r2.wav
All the samples should have normalised volumes, so they are all equally loud. The quieter velocity layers should not actually be quieter - they will have their volume set on playback.
Velocity control
You can control how loud each note is with the Velocity CV input and the Velocity knob. The CV input and the knob are multiplied together, so you can drive the input from a sequencer, Tact, etc. and use the knobs for balancing the kit.
Most instruments have multiple velocity layers, meaning they were recorded as, for example, soft notes, medium notes and hard notes. The module automatically selects the appropriate layer for the volume of the note it's playing, but you can control which layers are used by clicking the layers in the Layers control. If you want a softer, more laid-back sound, click to switch off the louder layers, and even loud notes will be played using a softer recording.
The Accent input boosts the volume of a note, and consequently moves it up into the next velocity layer. It doesn't do anything that you can't do with the Velocity input, but it's convenient if you're using a sequencer that has an Acccent output, like Valley Topograph for example.
Presets
The kit includes some presets, each providing a different overall sound by adjusting the various parameters of all the instruments - mostly the Velocity Layers and Distance.
The presets are:
Close & dry: Close-miked dry sound, no ambience, no stereo spread. For when you want full control over the ambience yourself.
Balanced: A mix of close-mikes and room mikes. A natural sounding kit.
Big room: Just the room mikes, for a bigger, more distant ambience.
Laid back: Balanced mix of mikes, and low-velocity recordings only for a gentler vibe.
Full on: High-velocity recordings only for a bigger, punchier sound. This preset also selects the most noisy instruments (for example Open hi-hat 2, which is noisier than Open hi-hat 1).
Hi-hats, and how to choke them
This works just like a physical drum kit: the hi-hats are connected as a single instrument, so if you play an open hi-hat followed by a pedal, the pedal will choke the open sound. (To choke without playing any further sound, turn the velocity of the pedal hi-hat to zero.)
If you want to treat the different hi-hat sounds as independent instruments, choose the (independent) variants from the instrument list.
Instrument options

Real time vs. per-hit modulation
When you're modulating a property of a drum instrument (Velocity, Pan, Distance, or Tuning) you might want changes in the modulation to be frozen for each hit, or you might want those changes to apply in real time.
In the real world, you can (in theory at least!) move your microphones around, or even move the instruments around, to change the pan or microphone distance while a note is sounding. But once you've hit (say) a cymbal, you can't change the velocity of that hit, and you can't adjust the tuning of the cymbal while the note plays.
But this isn't the real world! So you can choose, per instrument and per modulation, whether to apply modulation changes in real time, or whether to freeze them for each hit. The only slight nod to the real world is in the defaults: by default, Pan and Distance are applied in real time, while Velocity and Tuning are frozen for each note played.
Early decay
The "Early decay" sliders on the "Instrument options" menu let you control decay start and end of each instrument. You'd use these if you wanted to shorten the tail of an open hat, for example.
Normally the sliders are all the way to the right, at 100%, which plays the whole sample. If you pull the "Decay start" slider to the left, the sound will begin to decay earlier. Pull the "Decay end" slider to the left, and the decay will finish before the end of the sample. The volume slopes away linearly from the "start" to the "end", so you can make the sample fade out, or you can chop it off abruptly, or anything in between, by adjusting the difference between the decay start and the decay end.
Instrument options video
This short video demonstrates the Instrument options:
Entrian Drummer
The Acounstic Drums plugin includes a free copy of the drum sequencer from the Entrian Sequencers plugin. This drum sequencer has all the basics of a trigger sequencer, but also has plenty of features for creating and playing expressive drum grooves:
- Easy piano-roll-style editing in a resizable popup editor: create, edit, move, and delete notes with the mouse.
- Per-note velocity.
- Flams, ratchets, etc., with independent start and end velocity.
- Recording from MIDI input or PC keyboard, with controllable quantization.
- Multiple named phrases, CV-selectable.
- Controllable randomness of note properties.
Clicking in the main display on the module's panel shows the popup editor:
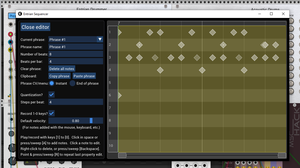
In the editor, you can:
- Left-click in empty space to add a note.
- Drag a note to move it.
- Left-click on a note to edit its properties (see below).
- Right-click a note to delete it.
- Ctrl-drag a note to adjust its velocity.
- Add lots of notes at once by holding down the 'A' key while sweeping your mouse. The Quantization setting controls how frequently the notes appear.
- Point at a note and press Backspace to delete it, or hold down the Backspace key and sweep your mouse around to delete lots of notes.
- Point at a note and press the 'R' key to Repeat the last property change (eg. a change of velocity, or randomness) or hold down the 'R' key and sweep your mouse around to apply that same edit to lots of notes.
- Use the scrollbar at the bottom of the window to scroll and zoom around long phrases.
- Record notes in real time using your computer keyboard (see below).
- Control the name, length, etc. of the phrase.
- Switch between different phrases to play and edit them.
All edits can be undone and redone in the usual Rack way, whether you're in the editor or not.
Phrases
You can define up to 25 named phrases, and select them by hand using the Phrase display on the panel, or from a sequencer or a scene controller using the Phrase CV input. Each phrase corresponds to a note, with C3 (-1V) selecting the first phrase, then running up 25 semitones to C5 (1V) which selects the last phrase.
When you select a new phrase from the panel menu, or via the Phrase CV input, it's optional whether the new phrase starts to play immediately, or whether the module waits for the end of the current phrase before changing.
You can also treat the Phrase CV input as a trigger, which will optionally:
- Skip to the next non-empty phrase.
- Select a phrase at random, using "fair" randomness, so that you never hear the same phrase twice in a row, and all the phrases get played before any of them repeat.
- Select a phrase at random using true randomness.
You can Copy and Paste phraes within the editor, and between instances of the module.
Clock
The module expects a 1/16th clock, or 4 beats per quarter note. But the playback resolution is way higher than that - you can position notes arbitrarily and they'll play at the right time, via an internal clock multiplier.
You can set the length of each phrase in beats, and the length of a bar in beats. The bar length only affects the painting of bar lines in the editor; it doesn't affect playback in any way.
Importing MIDI files
You can import drum grooves from MIDI files into Entrian Drummer. Here's a 4-minute video demo showing how to import a full song into Entrian Timeline, which covers importing of drum grooves:
See the Entrian Sequencers manual for more information on MIDI import.
Real-time recording
To record in real time, enable both Run and Record. There are three ways to record a groove in real time:
In the popup editor: You can press the number keys on your computer keyboard to record notes. They're placed at the current playhead position (the moving green line) with the velocity set by the Default velocity slider on the left. This works whether the Record button on the panel is pressed or not. You can switch it off with the Record 1-0 keys? checkbox, if you just want to audition the drum instruments without recording anything.
From a MIDI keyboard: Enable the Record button on the panel and connect a MIDI keyboard etc. via the MIDI-CV module to the C4-D5, Trigger, and Velocity inputs, and the white keys from C4 to D5 will record notes. Set the MIDI module to polyphonic, in Reuse mode, via its right-click menu.
From a General MIDI drum kit: Enable the Record button on the panel and connect a General MIDI drum kit via MIDI-CV to the GMIDI, Trigger, and Velocity inputs. Set the MIDI module to polyphonic, in Reuse mode, via its right-click menu.
When recording, notes are quantized according to the Quantization settings in the editor. The Steps per beat control governs the resolution of the quantized notes, so a setting of 4 steps per beat will round the note positions to the nearest 1/16th note.
Step recording
To record a groove step-by-step, connect a MIDI-CV module to the recording inputs as described above, then enable Record and disable Run. Now, when you hit a note on your keyboard / drum pads / whatever, that note will be added at the playhead position and the playhead will move forwards by the quantisation amount, ready for the next note. To add a rest, ensure your mouse cursor is hovering over the module and press the spacebar.
Step recording works one note at a time. You can use repeat markers to mark the section of the clip that you want to step-record into, and when you reach the end marker, the playhead will loop back to the start. That's how to step-record multiple instrument hits at the same playhead position (rather than trying to hit two keys at exactly the same time!)
Note properties, flams, ratchets, and randomness
Left-clicking on a note in the popup editor lets you edit the properties of that note:
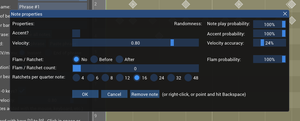
- Whether it's an Accent (which just triggers the Accent output; it's up to whatever instrument you're driving to decide what that means).
- Its velocity, for a single note, or the start and end velocity for a flam / ratchet (so your ratchets can have crescendo / diminuendo).
- Whether the note ratchets, and if so, how many times, how quickly, and whether the additional notes happen before or after the main note.
- Randomness: How likely the note is to play, how likely it is to be accented, how likely it is to be a ratchet, and how far to randomly adjust its velocity on each hit.
Swing
The Swing feature lets you offset some of the beats within the rhythm of your piece, so that rather than a regular rhythm, DAH dah DAH dah DAH dah DAH dah, some of the notes are offset. A typical swing rhythm delays every even-numbered note so that the odd-numbered notes are about twice as long as the even-numbered ones: DAH... dah-DAH... dah-DAH... dah-DAH...
The Entrian sequencers give you quite a lot of flexibility when defining a Swing pattern:
- You can offset quarter notes, eighth notes, or sixteenth notes.
- You can either delay them or bring them forward in time.
- You can control the exact fraction of a note by which they are offset.
- The whole sequence.
- Different songs within a sequence.
- Different tracks within a song.
- Different clips within a track.
- Different channels (eg. drum voices) within a clip.
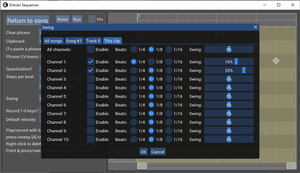
A more-specific pattern overrides a less-specific one, so for example a track-wide pattern applies to all the clips in that track unless a specific clip defines its own pattern.
The potential for making a truly hideous cacophany is huge. You're welcome.
Entrian Acoustic Drums is a commercial plugin, currently priced at $20. It’s available from the VCV Plugin Library.
If you have any questions, comments, or bug reports, please don't hesitate to email support@entrian.com.
Release history
Version 2.8.2: 28th May 2026:
- You can now drag and drop a MIDI file from your disk, or a MIDI clip from tools like Scaler 3, into the editor. Thanks, Jens Peter. #77
- You can now export your sequence as a MIDI file, either for single tracks or all the tracks. Thanks, Dominic, brbbbq, and Rob. #88
Version 2.7.1: 21st September 2023:
- Don't leave "notepoints" files in the working directory. That was a debugging feature that was accidentally left enabled in the production build.
Version 2.7.0: 20th September 2023:
- macOS arm64 is now supported.
Version 2.6.25: 3rd July 2022:
- Don't crash when importing a MIDI file with channel volume or channel expression on track 17 or higher. Thanks, Alain.
- CV clips in a sequencer set as a playhead follower now play smoothly. Thanks, Alain.
- Don't crash if the sample files are missing.
Version 2.6.24: 12th January 2022:
- Added support for Rack V2. #84
- Added the "Automatically create repeat markers when recording" option. Thanks, nay-seven. #68
- Added Swing. #57
- Fixed a crash-on-exit bug. Thanks, Drew, Ewen, and Vortico. #73
Version 1.6.22: 24th May 2021:
- Added the "Delay Clock" context menu commands. Thanks, spectromas. #76
Version 1.6.21: 3rd April 2021:
- Fixed a sequencer bug whereby a Reset could get out of step with other sequencers.
- Entrian Drummer: pointing at the module and pressing Backspace once again deletes the module.
Version 1.6.20: 30th March 2021:
- Added Step Recording. Thanks, Paul. #70
- Added optional "real time modulation" for all modulation inputs.
- Added "Early decay". Thanks, Steve.
- When a Drummer module is set up as a Playhead Follower, it no longer occasionally drops notes. Thanks, Gretchen. #67
- Quantisation now works properly for values of steps-per-beat that don't divide into 96. Thanks, Paul. #69
Version 1.6.19: 26th January 2021:
- Fixed a crash with the Randomize command. Thanks, Ewen.
- Where a drum note is a ratchet with a probability, and the ratchet comes before the note, and the note plays without the ratchet, the note now plays at the right time rather than playing the first note of the ratchet. Thanks, Tom. #63.
Version 1.6.18: 25th September 2020:
- Added support for custom samples.
- The sequence editor no longer loses its resizeability after you've launched a VCV-Host editor window.
Version 1.6.17: 5th September 2020:
- MIDI import in both Entrian Drummer.
- Context menu setting for "Stop recording at end of song". Thanks, Artem.
- "End of phrase" output. Thanks, Jue. #31.
- Holding Alt while dragging locks the drag to horizontal or vertical movement.
- Ctrl+A now selects all the notes in a clip. #25.
- Hold Ctrl while dragging a scrollbar thumb to zoom rather than scroll; the opposite thumb mirrors your movements.
- You can now pin the editor window so that it stays on top of other windows. #14. Thanks, Coirt.
- There are now Run / Reset buttons in the editor and corresponding outputs on the panel, so you can control your clock from the editor. #22. Thanks, Eurikon.
- The playhead and repeat markers now appear on the panel, so you can move the playhead and control the repeat range directly. #1.
- Shared playheads: connect the playheads of multiple sequencers together, so moving the playhead in one of them moves it in all of them. #46.
Version 1.6.16: 22nd June 2020:
- Right-clicking a scrollbar in the popup editor resets its position. #2
- Added a Clear button to the right of the Record button. Thanks, Jean-Sébastien. #34
- The bar lines for very long songs now paint properly in the editor. Thanks, Ken. #44
- There's now a Display checkbox for quantization, which paints the quantization grid in the editor. Thanks, Steve.
- The panel buttons now trigger on any value greater than zero, making them easier to control with µMap etc.
Version 1.6.1: 14th October 2019
First public release.