Entrian Source Search Online Manual
Indexing
Searching
Multiple tabs
Indexing
Options
Keyboard shortcuts
When things go wrong
The command line: ess.exe
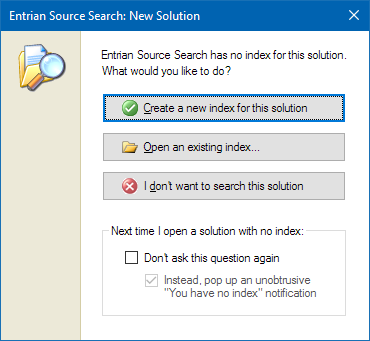
Each solution has an index, which indexes the code for that solution. When you open a solution that Source Search hasn't seen before, it prompts you for what to do:

If you don't want to be prompted, you can switch that off using the "Next time..." options.
Using Create will prompt you for the root directory/ies of your solution, and all the files in and under those directories will be indexed. (Source Search doesn't parse your solution to find your files, because often there are interesting files that aren't a part of the solution - ChangeLogs, documentation, header files, etc.)
If you have multiple solutions that use the same source tree, you can use Open to open an existing index and associate that index with this solution. (See also Secondary Indexes below.)
Once a solution has an index, indexing happens automatically, first when you load your solution, and then when any of the files under your chosen root folders are changed (even if they are changed outside of Visual Studio). The indexer is non-invasive - it runs in a low priority background thread, pauses when you interact with the search box or the search results, and throttles itself while you're interacting with your PC.
Irrelevant files like binary files and output files are excluded from the index. Binary files are excluded automatically, and there's a configurable list in More / Options of text file extensions, and directories, to exclude.
Once indexing is under way, you can start searching as soon as you like. Even if not all of your files have been indexed yet, you can search those that have. While the index is incomplete, you'll get a warning.
Indexing status
At the right-hand end of the toolbar is a status pane, which tells you what the indexer is doing. It can say:
- Scanning... Source Search is looking through your files for any new files to index, or for changes that have happened since the last time the files were indexed. This catches the case where, for instance, you updated your code from source control without having the solution loaded.
- Indexing... A new or changed file is being added or updated in the index.
- Up to date: What it says.
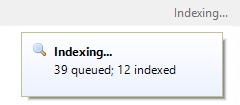
By hovering over the status text, you can get a bit more detail, in a tooltip:

The queued figure tells you how many files have been found that are either not in the index or out of date. As new or out of date files are found, this figure will increase, up to about 10,000, at which point the scanner will pause so as not to use too much memory for the queue, so you won't see this figure go much above 10,000.
The indexed figure tells you how many files have been indexed since this scan started. That figure steadily increases as files are taken out of the queue and added/updated in the index.
Forcing a refresh
Under normal circumstances, your index will be kept up to date with your sources automatically, by two mechanims:
- When you open a solution, Source Search scans your sources and adds or updates the index with any new or changed files.
- While Visual Studio is running, Source Search uses a file system watcher to keep up to date with changes in real time, as they are written to the disk.
But sometimes you want to manually make sure that everything is up to date, and you can do that using the "More / Force index refresh" commands. There are two of these; "changed files only", which will skip any file that looks up to date (based on its timestamp) and "all files", which re-indexes all files whether they look like they've changed or not.
Index properties
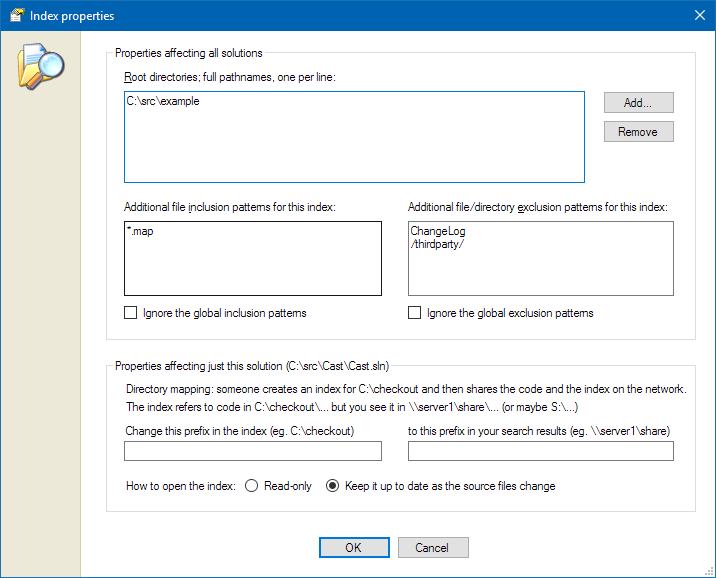
The index properties dialog lets you control the root directories, index-specific inclusion and exclusion patterns, and directory mapping for your index:

The global Source Search options (see Global options) specify the default inclusion
and exclusion patterns, but you can override them for a specifc index here - for example, if you have solution that has some data files
with a .map extension that you want indexed, but your global options exclude *.map.
Directory mappings let you share indexes between machines, where each machine sees the source files in a
different place - one machine might see it on its own disk as C:\checkout whereas another might see it on a network
share as \\server1\share. This is most useful with secondary indexes - see below.
The final option is whether to open the index read-only. This is again most useful with secondary indexes - a secondary index might refer to code that never changes, like a third party library, so there's no need to spend cycles scanning it for changes. Or it might live on a network drive to which you don't have write permission (in which case, if you try to open the index for update, Source Search will ask you whether you'd like to open it read-only instead).
Secondary indexes
Some projects are made up of a core piece that you're working on, plus other pieces around that. Take Source Search itself for example - it uses Lucene.Net behind the scenes. As a developer working on Source Search, sometimes I want to include the Lucene.Net sources in my searches, and sometimes not.
Also, the Lucene.Net sources rarely change, so there's no need to scan them for changes. It would be good for that index to be read-only.
In a large organisation, you might even keep these shared sources and the corresponding index on a network drive, where the whole team can access them. They would have read-only access, and the server machine would keep the index up to date as necessary - Source Search is fine with one machine writing to an index while others are reading it.
You can use the "More / Open a secondary index..." command to open a secondary index. You can then choose from all the indexes on your PC, or use the "Browse for an index..." button to open one from elsewhere. Source Search remembers which secondary indexes you've opened for each of your solutions.
When you have multiple indexes open, the results from all of them are combined when you search.
Managing indexes
Use the "More / Manage indexes..." command to show the Manage Indexes dialog:

From the Manage Indexes dialog, you can:
- See a list of all your indexes, where they are stored, and which solutions they are associated with.
- Filter that list by the names, locations, solutions, etc.
- Create a new index, for instance to use as a secondary index.
- Delete an index.
- Rename an index.
- Move an index, for example if a drive is low on space, or you want to put your index on a different drive from your checkouts.
- Mark an index to be recreated when it is next opened, for instance because it's been corrupted by a power failure.
Index autocreation
Once your team is hopelessly addicted to Entrian Source Search, you'll all want to use it for all your solutions without
being prompted. You can do this by creating (and adding to your source control system) a file called
EntrianSourceSearch.autocreate in the same
directory as your solution file, or in one of its ancestor directories. When you load a solution that Source Search
hasn't seen before, if an EntrianSourceSearch.autocreate file exists, then an index will be quietly
created for that solution, with the root directory of the index being the directory of the
EntrianSourceSearch.autocreate file.
The EntrianSourceSearch.autocreate file can be empty, in which case the index will use all
the default settings - index location, inclusions, exclusions, etc. If you want to control any of that, you can,
by writing a JSON description of the index settings into EntrianSourceSearch.autocreate, like this:
{
  "indexLocation": "C:\\src\\autocreated",

  "excludeList": ["$(AutocreateDir)\\Build"],
  "ignoreGlobalExclusions": true,

  "includeList": ["*.txt"],
  "ignoreGlobalInclusions": true,
}
All the properties are optional. Note the double-backslashes in the pathnames, because this is JSON.
The macro $(AutocreateDir) gets replaced with the directory of the EntrianSourceSearch.autocreate
file (which is the root directory of the index).
The indexLocation directory, if specified, is the parent directory of the autocreated index.
The indexLocation directory will itself be created if it doesn't already exist. If you specify
indexLocation, you need to be careful that it's valid on every developer's PC, and that they
have permission to create it.
The includeList and excludeList are lists of filenames, directory names, full pathnames
(as above), or wildcard patterns to be included/excluded from the index.
Indexing from the command line
As well as indexing your code from within Visual Studio, you can create and update indexes from the command line - see the section on the Source Search command line tool, ess.exe.
Entrian Source Search makes Visual Studio faster and more
productive to use. ![]() and try it for yourself.
and try it for yourself.


